The Battle of Fromelles 19 and 20 July, 1916
The Battle of Fromelles (19–20 July 1916) was Australia's first action on the Western Front in WWI. Intended as a diversion from the Somme offensive, it resulted in the worst 24 hours in Australian military history. Over 5,500 Australian casualties occurred in less than a day, with no strategic gains. The battle remains a symbol of tragic loss and enduring remembrance.
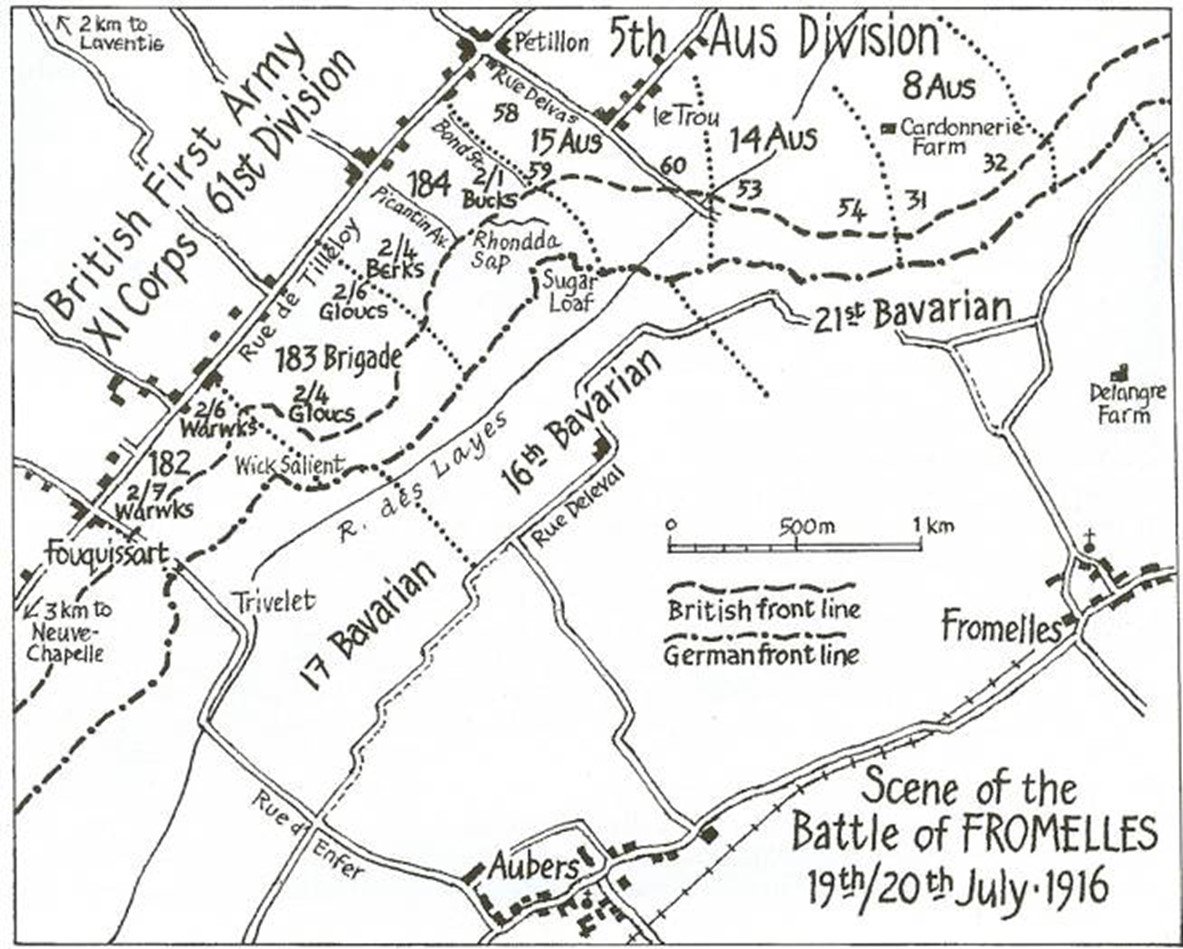
The Australian War Memorial describes the Battle of Fromelles in the following terms:
Fromelles was the first major battle fought by Australian troops on the Western Front. Directed against a strong German position known as the Sugar Loaf salient, the attack was intended primarily as a feint to draw German troops away from the Somme offensive then being pursued further to the south. A seven-hour preparatory bombardment deprived the attack of any hope of surprise, and ultimately proved ineffective in subduing the well-entrenched defenders.
When the troops of the 5th Australian and 61st British Divisions attacked at 6 pm on 19 July 1916, they suffered heavily at the hands of German machine-gunners. Small parts of the German trenches were captured by the 8th and 14th Australian Brigades, but, devoid of flanking support and subjected to fierce counter-attacks, they were forced to withdraw.
By 8am on 20 July 1916, the battle was over. The 5th Australian Division suffered 5,533 casualties, rendering it incapable of offensive action for many months; the 61st British Division suffered 1,547. The German casualties were little more than 1,000. The attack was a complete failure as the Germans realised within a few hours it was merely a feint. It therefore had no impact whatsoever upon the progress of the Somme offensive.
Although designed as a feint to keep German troops from being moved to fight on the Somme, soldiers were also directed to capture and hold the first line German defences. It was to be more than a diversion.
The Battle involved 12 Australian Battalions, and 12 British Battalions across a front of 4000 yards (3.65 kilometres). The Battle also involved another 39 distinct units, including Artillery, Signals, Engineers and Ambulance. There were 17,200 allied soldiers working within an area of four square miles.
Fighting Unit Arrangements
The units involved in the attack were to be (from north east to south west):
| Assaulting battalions | 32nd (WA) |
| 31st (Qld, Vic) |
| Reserve battalions | 29th (Vic) |
| 30th (NSW) |
| Assaulting battalions | 2/4th Royal Berkshire (right) |
| 2/1st Buckinghamshire (left) | |
| 2/1st Royal Berkshire (support) | |
| 2/4th Oxford and Buckinghamshire (support) |
| Reserve battalions | 2/5th Gloucestershire |
| B Coy 1/5 Duke of Cornwall Light Infantry | |
| 3rd Field Coy, Royal Engineers, and MG Coy, and TM Bty |
| Assaulting battalions | 53rd |
| 54th |
| Reserve battalions | 56th |
| 55th |
| Assaulting battalions | 2/6th Gloucestershire (right) |
| 2/4th Gloucestershire (left) | |
| 2/6th Worcestershire (support) |
| Reserve battalions | 2/5th Worcestershire |
| 2/7th Worcestershire |
| Assaulting battalions | 59th |
| 60th |
| Reserve battalions | 57th |
| 58th |
| Assaulting battalions | 2/7th Royal Warwickshire (right) |
| 2/6th Royal Warwickshire (left) | |
| 2/5th Royal Warwickshire (support) |
| Reserve battalions | 2/8th Royal Warwickshire |
| A Coy 1/5 Duke of Cornwall Light Infantry | |
| 2 Coys 2/8 Warwicks | |
| 1 Section 182nd MG Coy and TM Battery |
Assistance Would Be Provided From the Following Units
Australian Supporting Units
| 5th Division HQ | ||
| 5th Division Artillery HQ | 5th Pioneer Battalion | |
| 5th Divisional Sanitary Section | 5th (10th) HQ Coy Signal Corps | |
| 5th Divisional Ammunition Column | 5th Division Train | |
| 5th Divisional Trench Mortar Battery | 5th Divisional Machine Gun Company | |
| 5th Divisional Engineers | 5th Divisional Traffic Control | |
| 8th Brigade HQ | ||
| 8th Machine Gun Company | 8th Field Coy Engineers | |
| 8th Field Ambulance | 18th Coy Signal Corps | |
| 8th Light Trench Mortar | ||
| 14th Brigade HQ | ||
| 14th Machine Gun Coy | 14th Field Coy Engineers | |
| 14th Field Ambulance | 28th Coy Signal Corps | |
| 14th Light Trench Mortar | ||
| 15th Brigade HQ | ||
| 15th Machine Gun Coy | 15th Field Coy Engineers | |
| 15th Field Ambulance | 29th Coy Signal Corps | |
| 15th Light Trench Mortar | ||
| 4th Divisional Artillery | ||
| 11th Brigade AFA | 13th Brigade AFA HQ | |
| 49th Battery AFA | 50th Battery AFA | |
| 51st Battery AFA | 113th Howitzer Battery AFA | |
| 14th Brigade AFA HQ | ||
| 53rd Battery AFA | 54th Battery AFA | |
| 55th Battery AFA | 114th Howitzer Battery AFA | |
| 15th Brigade AFA HQ | ||
| 57th Battery AFA | 58th Battery AFA | |
| 59th Battery AFA | ||
| 25th Brigade AFA HQ | ||
| 52nd Battery AFA | 56th Battery AFA | |
| 60th Battery AFA | 115th Howitzer Battery | |
| Other Supporting Corps | 2nd Tunnelling Company | Australian Army Medical Corps |
| Australian Army Veterinary Corps | Australian Army Pay Corps | |
| Australian Provost Corps | Australian Army Ordnance Corps | |
| Australian Army Salvage Corps | Chaplains’ Department |
British Supporting Units
| 61st Division Artillery (RFA) | ||
| 305 Brigade RFA | 306 Brigade RFA | |
| 307 Brigade RFA | 308 Brigade RFA | |
| Royal Engineers | ||
| All South Midland | ||
| 1/3 Field Coy | 2/2 Field Coy | |
| 3/1 Field Coy | ||
| Field Ambulances | ||
| 2/1 Field Ambulance | 2/2 Field Ambulance | |
| 2/3 Field Ambulance |
Aerial Support
On 19 July, the 5th Division Artillery would also be assisted by the Royal Flying Corps.
Artillery assistance
Reconnaissance and liaison
The Scale of the Attack
The twelve attacking battalions were supported by more artillery than at the Battle of Aubers Ridge in May 1915, when a similar number of battalions attacked in the same area.
More ammunition was available than in 1915 and trench mortars were added to the artillery for wire-cutting. With support from First Army artillery to the south, 296 field guns and 78 heavy guns were ready, giving a greater concentration of heavy artillery than that of the Fourth Army on the first day of the Somme.
“And as the last hours of 19 July ticked away, many men wrote to loved ones, ‘just in case’.”
The German Defences
The German forces were well established with concrete bunkers, most notably at the ‘Sugar Loaf’ and the ‘Wick’ salients, and had well-placed artillery on the higher ground of Aubers Ridge. Both would be used to devastating effect.
The Germans had seen the preparations for the battle, so there was no element of surprise.
The Cost
The official summary of the Battle states that Australians suffered 5,533 casualties, of which 1,917 were killed or died of wounds, while the British suffered 1,547 casualties, of which 519 were killed or died of wounds. German casualties were a little more than 1,000.
The Australian figures did not originally include another 40 soldiers said to have been killed on 21 July 1916. They have since been included among those who died on 19 and 20 July. The number of Australian deaths from the two days of the Battle is therefore 1,957. More would die from their wounds in the weeks and even months afterwards.
From the Battlefield to Pheasant Wood
For many of the missing soldiers of Fromelles, the story did not end when the fighting stopped.
After the Battle, German troops cleared the battlefield in front of their positions and buried the bodies of Australians who had died close by in mass graves. The graves became lost and remained undisturbed for the next 90 years.
After the Armistice, the remains of 410 Australian soldiers who could not be identified and who had attacked at Fromelles were buried in VC Corner Cemetery.
The names of the unidentified Australians whose remains could not be identified at the end of the First World War were recorded on the memorial wall at the back of VC Corner Cemetery.
The search for the graves of the missing soldiers of Fromelles begins.
The site of the mass graves was identified beside what is now known as Pheasant Wood.
From May to September, the remains of 250 soldiers were exhumed. A worldwide identification project began, using historical research and DNA matching to identify the recovered soldiers.
The 250 soldiers were reburied at the new Fromelles (Pheasant Wood) Military Cemetery, in the same order in which their remains had been recovered.
Fromelles (Pheasant Wood) Military Cemetery was dedicated, exactly 94 years after the Battle.
As soldiers are identified, their names are removed from the VC Corner Cemetery memorial because they now have an identified grave at Fromelles (Pheasant Wood) Military Cemetery.
The Search Continues
181 soldiers identified – help us find the rest
DNA from living relatives remains an important part of the continuing effort to identify the missing soldiers of Fromelles.
Find Out More